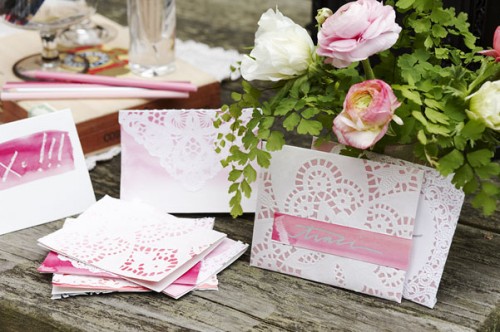
For this DIY project, we wanted to share an easy way to make pretty valentines (or seating cards or even invitations–the possibilities are endless) using watercolors. Watercolors are a great medium because they produce gorgeous variations in shade and tone (perfect for all of the reds, raspberries, peaches, and pinks that go with Valentine’s day!). We’ll be walking you through two projects; both have the potential to look sweet and romantic or clean and modern. Have fun & experiment! – Miya & Elisabeth
You will need:
Watercolors in colors that suit your fancy
A brush or 2
A glass of water
A white crayon
Paper doilies
Spray adhesive (you can experiment with other adhesives, but the spray adhesive worked best for us)
Cutting instruments (scissors or an X-acto knife)
Cardstock or watercolor paper, cut to the desired size of your card (this should be the size of a folded card, meaning twice the length as the size you want the front of your card to be)
For the doily valentine:
Start by creating a wash over your card with color. Be sure to use enough water that the color goes on smoothly without any gaps. Also experiment with mixing colors and/or using more or less water to create gradations in color on your card. When you’re happy, let it dry.
Move a paper doily (or 2 or 3) over your finished card to see what pattern you like on top. Don’t be afraid to cut apart the doilies! When you’re happy, spray the doily with adhesive, following the directions, and adhere to your card. Cut away the excess doily.
Fill the inside of the card with loving sentiments, sappy memories, and/or hopes for the future.
For the crayon valentine:
Start by using your white crayon to make a pattern or write a sentiment on your card. You’re writing where you don’t want the paint to take to the paper, so keep that in mind if you’re drawing something.
When you’re happy with your design, paint over it with your watercolors. We found that we really liked a single swash of color, but we also tried painting the whole card, and that was nice, too.
Declare your undying love for the recipient, and sit back and relax, reveling in your job well done.
And are you loving those envelopes? The DIY is here! We used tracing paper, and even though the doilies in the tutorial are square, we used round ones that were slightly smaller than my finished size, and we loved the way they looked.
Have fun, everyone! We’d love to see your cards if you do this project, so please do email us at hello{at}youplusmestyling{dot}com to show off what you’ve made!
[image from Sean Dagen]


